Romans 12:12 (KJV)
12 Rejoicing in hope; patient in tribulation; continuing instant in prayer;
Why Do Switches Bounce? | See It on an Oscilloscope!
Have you ever flipped a switch and wondered what really happens inside?
We normally think of a mechanical switch as either ON or OFF. But when the metal contacts inside a switch come together, they don’t always make one clean connection.
Instead, they may touch, separate, and reconnect several times before settling.
This is called mechanical switch bounce.
In this video at Build Circuits With Rich, we’ll build a simple circuit and use our DSO138 oscilloscope to observe this fascinating behavior.
1. How an SPDT Slide Switch Works
For this experiment, we’re using an SPDT slide switch.
SPDT stands for Single Pole, Double Throw.
Our switch has three terminals:
-
Terminal A: One outside connection
-
COM: The center common terminal
-
Terminal B: The other outside connection
Inside the switch, a moving metal contact connects COM to either Terminal A or Terminal B, depending on the slider position.
When the switch moves, the metal contacts may briefly make and break their connection several times.
Think of a ball bouncing on a hard surface before coming to rest. The switch contacts can behave in a similar way.

2. Ideal Versus Bouncing Waveforms
Ideally, turning a switch ON would produce one clean electrical transition.
The output would change from 0V to 5V and remain HIGH.
But with a mechanical switch, the contacts may bounce before settling.
This can produce several rapid transitions between LOW and HIGH during a single switch operation.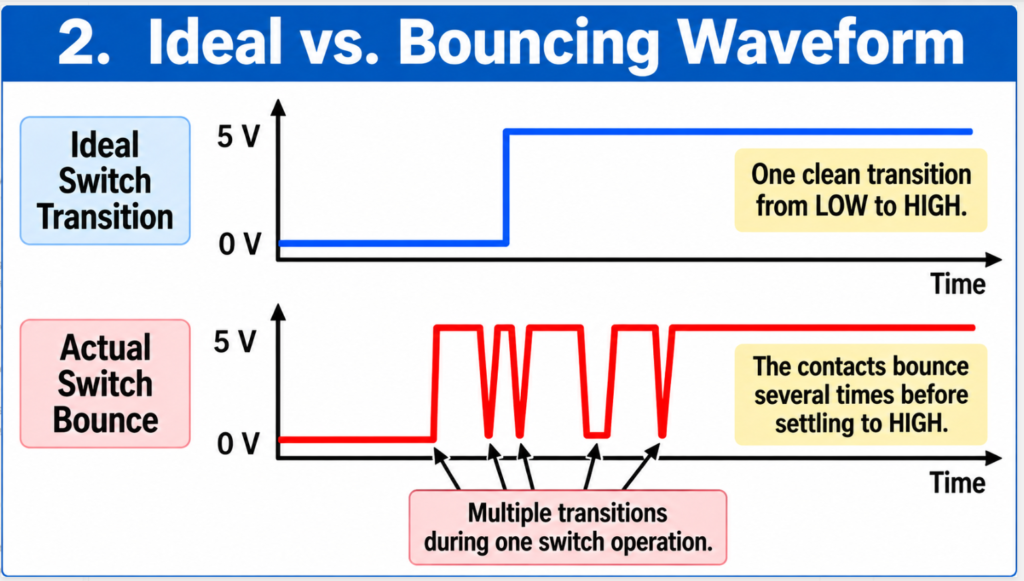
These transitions can occur in microseconds or milliseconds.
Although they’re too fast for us to see, digital electronic circuits can detect them.
For example, a digital counter might interpret several bouncing transitions as multiple button presses.
That’s why switch debouncing is important.
3. Our Switch Bounce Test Circuit
Our experiment uses just a few components.
Components
-
SPDT slide switch
-
10kΩ resistor
-
5V DC power supply
-
Breadboard and jumper wires
-
DSO138 digital oscilloscope
Circuit Connections
Switch COM: Connect to +5V.
Switch Terminal A: Leave unconnected (not used).
Switch Terminal B: Connect to VOUT.
10kΩ Pull-Down Resistor: Connect between VOUT and GND.
Oscilloscope Probe Tip: Connect to VOUT.
Oscilloscope Ground Clip: Connect to circuit GND.

The 10kΩ resistor acts as a pull-down resistor.
When the switch is disconnected from Terminal B, the resistor holds VOUT at approximately 0V.
When COM connects to Terminal B, VOUT rises to approximately 5V.
The resistor prevents VOUT from floating, but it does not eliminate mechanical switch bounce.
4. Observing Switch Bounce With the DSO138
Now comes the fun part!
We connect our DSO138 oscilloscope to VOUT and capture the switching event.
Oscilloscope Settings
Coupling: DC
Vertical Sensitivity: 1V/div
Trigger: Rising edge
Trigger Level: Approximately 2.5V
Capture Mode: Single (SING)
Timebase: 50µs/div or 0.1ms/div
With the switch OFF, our output is approximately 0V.
With the switch ON, our output measures approximately 5.04V.
However, when we examine the transition closely, the waveform can reveal several rapid voltage changes before settling.
50 microsecond time base: .1 millisecond time base:
 These irregular transitions are consistent with the mechanical contacts bouncing during the switching operation.
Not every switching event produces exactly the same waveform. The amount and duration of bouncing can vary, and some small spikes may also be caused by electrical noise.
This is why the oscilloscope is such a useful tool. It lets us investigate events that happen far too quickly to observe directly.
5. Why Does Switch Bounce Matter?
Mechanical switch bounce can cause unexpected behavior in digital circuits.
For example:
-
A counter may register multiple counts from one switch operation.
-
A digital input may detect several transitions instead of one.
-
A control circuit may respond more than once to a single action.
The solution is called switch debouncing.
Debouncing prevents unwanted contact transitions from being interpreted as separate switching events.
There are several ways to debounce a switch, including electronic circuits and software techniques.
6. Next Video!
In our next experiment, we’ll build a switch debounce circuit using a 7400 NAND gate IC.
We’ll configure the NAND gates as an SR latch and use our oscilloscope to examine its output.
We’ll see how the latch helps produce clean digital transitions despite mechanical switch bounce.
Now that we’ve seen the problem, it’s time to build the solution!
Components and Equipment — Amazon Affiliate Links
🔧 Parts & Tools Used in This Video
🔹 DSO138 DIY Digital Oscilloscope Kit — 2.4″ TFT, 1MSPS, with Probe
https://amzn.to/4ynvovt
🔹 Alligator Clip Test Leads — 10 Pieces
https://amzn.to/4s7T2L0
🔹 AstroAI Digital Multimeter — DM200M
https://amzn.to/4hZXoPD
🔹 400-Point Solderless Breadboards — 6-Pack
https://amzn.to/4yo8V1h
🔹 BOJACK Electronics Component Fun Kit — 480 Pieces, 37 Values
Includes an 830-point breadboard, power supply module, jumper wires, potentiometer, and assorted electronic components.
Affiliate Disclosure: As an Amazon Associate, I earn from qualifying purchases. These links help support Build Circuits With Rich at no additional cost to you.
Final Thoughts
Mechanical switches are simple devices, but their electrical behavior can be surprisingly interesting!
With just one resistor, an SPDT slide switch, and an oscilloscope, we’ve explored how a single physical switching action can produce multiple electrical transitions.
Understanding switch bounce is an important step toward designing reliable digital circuits.
Thanks for visiting Build Circuits With Rich!
Keep learning, keep experimenting, and keep building circuits!
WHOO BUDDY!! 🔌🚀
My Notes:
Video Notes
Want more electronics lessons?
For more beginner-friendly electronics lessons, circuit walkthroughs, and hands-on breadboard builds, visit:
https://buildcircuitswithrich.com
Prefer video?
Watch full lessons on the Build Circuits With Rich YouTube Channel.
Back To: Videos