LED Forward Voltage & Current Explained for Beginners
Watch the Video:
What You’ll Learn:
• What LED forward voltage means
• Why LEDs need a resistor
• How to calculate LED current safely
• How series resistors control brightness
What Is Forward Voltage?
An LED does not use all of the supply voltage.
Instead, it drops a specific voltage when it turns on.
This is called the forward voltage.
For this lesson we will use:
Green LED forward voltage ≈ 2 V
That means when the LED is on, it “uses” about 2 volts.
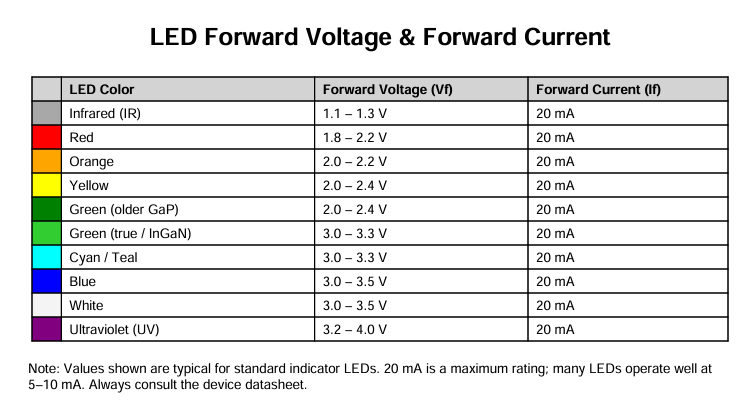
Normally we would look up the LED in a datasheet. However, in my case I did not have a datasheet to review. So, I’m attaching a sheet with average voltage and current LED specifications you may use if you don’t have access to a datasheet. The color of the LED determines the Forward Voltage drop. In my case I had a Green (older GaP) LED. So, the voltage was in the 2.0 – 2.4 V range. Current was 20mA max. Remember 20mA is maximum current that can flow in the LED. It is usually better to cut the 20mA value in half because the LED will still be bright enough and will allow your LED to have a longer life span. So, shoot for 10mA when powering an LED:
Why LEDs Need a Resistor
If you connect an LED directly to a battery, too much current will flow and the LED can burn out. A resistor is added in series to limit the current.
The resistor absorbs the extra current and keeps the current safe. When resistance goes up the current goes down which makes the LED dimmer.
Internal structure of an LED: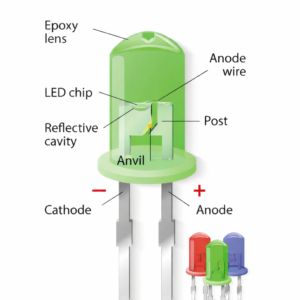
Our Example Circuit:
• Supply voltage = 5 V
• LED forward voltage = 2 V
• Series resistance = 300 Ω
(three 100 Ω resistors in series because 100 Ω resistors were all I had available )
Why I Chose 300 Ω
I used three 100 Ω resistors in series to make 300 Ω.
This gives us a safe LED current while also keeping the power in each resistor low.
Most beginner resistor kits include ¼-watt resistors, so it’s important to make sure the resistor will not overheat.
We’ll calculate that next.
Step-by-Step Calculation
1) Voltage Across the Resistor
The LED uses 2 V from the supply.
Remaining voltage for the resistor:
V_R = 5 V − 2 V = 3 V
2) Current Through the Circuit
Using Ohm’s Law:
I = V / R
I = 3 V / 300 Ω
I = 0.01 A = 10 mA
3) Power Dissipated in the Resistors
In this case my resistors are rated at ¼-watt. So we want to make sure to stay below this rating so we don’t burn up the resistor.
Power in the resistor network:
P = V × I
P = 3 V × 0.01 A
P = 0.03 W
That’s only 30 milliwatts total.
Since we used three resistors, each resistor only dissipates about:
0.03 W ÷ 3 ≈ 0.01 W per resistor
That is far below the ¼-watt rating (0.25 W) of the resistors.
Because 0.01 W < 0.25 W.
So, the resistors will run cool and safely.
4) Kirchhoff’s Voltage Law Check
Kirchhoff’s Voltage Law (KVL) states that all voltages in a loop must add up to the source.
LED drop + resistor drop = supply voltage
2 V + 3 V = 5 V
This confirms the voltage calculations above.
What This Means
The LED current is safe at about 10 mA.
The resistors are operating far below their maximum power rating, so they will not overheat.
This is how real circuits are designed — not just for correct voltage and current, but also for safe power levels.
Common Beginner Mistakes
• Connecting an LED directly to a battery
• Forgetting LEDs have polarity
• Ignoring resistor wattage ratings
• Thinking voltage doesn’t matter once the LED turns on
Try This Yourself
Build this circuit using:
• 5 V supply
• Green LED
• Three 100 Ω resistors in series
Measure voltage across the LED and across the resistors.
You should see about 2 V across the LED and about 3 V across the resistors.
Prefer video?
Watch full lessons on the Build Circuits With Rich YouTube Channel.
Back To: Videos